Sunday, November 24, 2013

I Think I Can, I Think I Can

I'm chugging along with this running thing just like the Little Engine That Could.  My longest run so far is 7 miles.  I stretch a lot in my Pilates class twice a week, which is conveniently on my running days, but I somehow managed to not stretch my IT band enough and tweaked my knee.  (I keep wanting to say twerk. Thanks Obama Miley!)  The knee injury sucks.  I've been sore a lot lately and feeling like being sore all the time is my life for the next 5 weeks.

New measurements:
Weight:  105.6 lbs
Waist:  26.5"
Thigh:  18.5"
Calf:  13.5"
Hip at the bone:  33"
Hip at the fullest part:  36.5"
 
Interesting. . . 

I think the weight loss and corresponding inches loss is mostly due to not being able to keep down any food after my Saturday runs.  I am okay on the treadmill at the gym, but after I finish my Saturday runs, I vomit a few hours later.  The first time, I thought it was because of the whiskey I had on Friday.  I don't drink hard liquor very often and I can see that being rough on my stomach.  I was feeling fine after my second Saturday run.  I ate something and I even helped Ryan paint the kitchen a bit before I decided I couldn't stand the smell of myself and took a shower. I am either literally allergic to running or I need to deal with my stench for much longer after runs because I got nauseous not long after showering.  I know water changes your internal business somehow--the organs absorb that water so it makes you feel different.  It might be the water and pressure on my organs from the shower that is making my already funky innards even more funky.  I'll see what happens next run.  Stand back, I'm gonna try science. 


This is how I feel right now--5 weeks left.

Wednesday, November 20, 2013

WIP: On the Job Dress

 It's highly doubtful I will actually finish my On the Job dress by the end of the Fall Essentials Sewalong, but I am making progress.  Unfortunately, I haven't had much time to sew the last month or so.  I did, however, trace off several patterns that I want to make in the coming months.  I think I just had the tracing mojo and I didn't want to waste it.  Tracing is normally such a chore!
 
I'm using Simplicity 3673 for the main dress.  I haven't decided on a sleeve pattern yet.  I think I want something more substantial than just a simple cap sleeve, so I will dive in my pattern stash for something suitable.

  
The skirt part has loads of darts--12 total.  I think they provide a lovely shape.

I am considering moving the front bust gathers inward 1/2" on each side.  I think the gathers are ever-so-slightly in the wrong place. 

I also need to lower that armscye a bit.  It's tolerable, but I think I will be happier if it's slightly lower overall.

It's hard to see in this photo, but the back neckline gapes a fair amount.  That was a quick adjustment.

I pinned 1/2" out on each side for about 2" and the neckline looks much better now.

Here's the fabric I'm using.  Both are from JoAnn's.  The green and navy is the shell fabric and it cost me about $2.50 a yard I think.  The solid navy is actually a poly/cotton quilter's solid.  I wanted a batiste for the lining, but I was having a hard time finding anything navy even online.  This blend quilter's cotton is lightweight and drapes similar to the shell fabric I chose.  I think the two are a good match.  I will be underlining the shell fabric this time!  I learned my lesson from my first Hazel!

And if you were wondering what the hell On the Job dress means, this is my inspiration:
ModCloth's "On the Job" dress.


Tuesday, November 19, 2013

Fashion Plate: Cheeriest and Dearest Dress

Fashion Plate: Cheeriest and Dearest Dress


This week's Fashion Plate is ModCloth's Cheeriest and Dearest Dress.  To me, this looks like a festive dress that will take you from the holidays and on into spring and summer.  I am in love with this neckline and happen to already have the pattern I choose for this Fashion Plate:  New Look 6020.  The fabric is Woodland Pals Tossed Deer by Kaufman.  It is available in Nature (as shown above) and Bermuda.

Monday, November 18, 2013

FO: Sabrina Slippers

"Sabrina Slippers"
Just the Facts:
Fabric:  used my remnants from another project of 27" of Michael Miller Houndstooth in teal.  I guess I'll say these took a fat quarter's worth?  $1.50
Notions:  Thread from stash
Pattern:  ithinksew Sabrina
Year:  modern ~2013
Time to Complete:  A long time--much longer than they should have
First Worn:  November 16, 2013
Wear Again:  yup
Total Cost:  $5.00 including the pattern 

I love love love this fabric times eleventy billion.   It's fun and unassuming and it makes me incredibly happy to look at my feet with the slippers on!

 
These turned out fairly well in spite of my initial problems.  I ended up unpicking the seams I made on my first straps, sewing the cut pieces back together, and refinishing the straps.  This was more work than really necessary, but I didn't have enough fabric to cut 4 more straps.  I had to do the best I could with what I had.  I made my fudged up straps the vertical one that goes from the toe to the other strap.

The pattern is available in whole sizes only from 5-11.  I happen to wear a 6.5 normally, though I often choose the 6 when shoes are only available in whole sizes.  The 6 sole pattern looked like it wouldn't give me enough room in the toes, so I decided to go with the 7 to start.  In order to slim down the shoes a bit, I used a 1/2" seam allowance around the toes and the sides, gradually decreasing to 1/4" in the heel.  I think that worked quite well, though I have no room for socks should I want to wear those with the slippers.
 
Excuse all the random threads.  I unpicked the seams several times while making these because I wanted to get my curves right.  I like that the slippers are slightly higher in the back.  This will help keep them on my feet.  The side straps close with velcro.  I find the velcro isn't necessary for me as the slippers just slip right on and off.

Overall, I like the finished object.  The project was actually a challenge for me.  The toes and heels were quite difficult to stitch around while maintaining an even and smooth seam.  That fabric liked to bunch up.  Something that probably wasn't necessary, but I thought provided for a nicer finish, was stitching all along the sole of the slipper.  One has to leave a turning hole on the outside of the fabric and stitch that up at the end.  I prefer not to handstitch, so I pinned that seam down and stitched close to the side seam with a 1/8" seam allowance.

That's it for today!  Have a fabulous week.  See you back tomorrow for another Fashion Plate.
 

Wednesday, November 13, 2013

I can't believe I'm training for a half marathon

Here's a random Wednesday post for ya.  I consider myself to be relatively in shape.  I used to be really big into weightlifting--I would do bicep curls with 30 pound dumbbells at 4'11" and 115 pounds and deadlift my weight.  A whole bunch of things happened at once and I just fell out of weightlifting.  So here I am, embarking on Run Day 2.  I'm curious how this training will change my body, if at all, and I'm going to post some progress photos along the way over the next couple months/6 weeks.  Gah!  Stupid run is in 6 weeks and 4 days!

Whelp.  Here I am.  Deets:
Starting weight:  106.6 lbs
Waist:  27"
Thigh:  19"
Calf:  13"
Hip at the bone:  33"
Hip at the fullest part:  36"

I'm smiling because I like the smile detector.  It always takes the best pictures.  I also wanted to show off my sweet new shoes.  Ryan picked them out for me.  I overlooked them because PINK.  I don't want pink shoes.  But they are super comfy and look mostly white when they are on my feet.

Saucony Kinvara.  Totally badass shoes.  The guy making my training program suggested some awful shoes.  He said the Kinvaras are for advanced runners, which I am most certainly not.  He also forgets that my shoes that are not flip flops are Vibrams.  I'm used to the light weight and not pillowy shoes.  These were a good choice for me.  I ran 5 miles on Monday in them.

And something sewing related:  I started making a pair of slippers last night.  I'm seriously disappointed in the instructions.  Maybe it's just me, but the photos are not helpful.  Protip:  Don't photo black and white shoes for use in your picture instructions.  I can't see SHIT.  There are also some errors on the pattern pieces themselves.  Like it says Cut 2 of something you really need 4 of.  You use the same pattern piece for 2 different pieces.  I cut 2 and was really confused.  The pictures were not helpful because the second piece looked really short against the black background.  I thought that for sure I was supposed to cut along the line on that pattern piece.  I wasn't.  I did buy that last yard of this Michael Miller houndstooth fabric from fabric.com.  It ended up being only 27."  And then fabric.com got more in stock.  I'll have to see how my budget shakes out for November to see if I can buy more of it.  

HUMP DAY!

Have a good one, 
~elle

Tuesday, November 12, 2013

Fashion Plate: Have the Dance Floor Dress

Fashion Plate: Have the Dance Floor Dress


This week's Fashion Plate is ModCloth's "Have the Dance Floor Dress in Teal," except mine is mostly aqua.  The fabric I chose is this white and turquoise mini dot fabric.  I thought this aqua trim went well for the accent.  McCall's 6557 is the pattern I chose for this look.  The inspiration dress doesn't have traditional bust shaping.  As you can see, there are small pleats emanating from the center bodice.  The ModCloth version has a V-back too, but I find that you can have a low front or a low back--not both.  The bodice just won't stay put on one's shoulders if front and back are both low.  Does you have a different opinion on that?  It could be just me and my shoulders of doom.

Monday, November 11, 2013

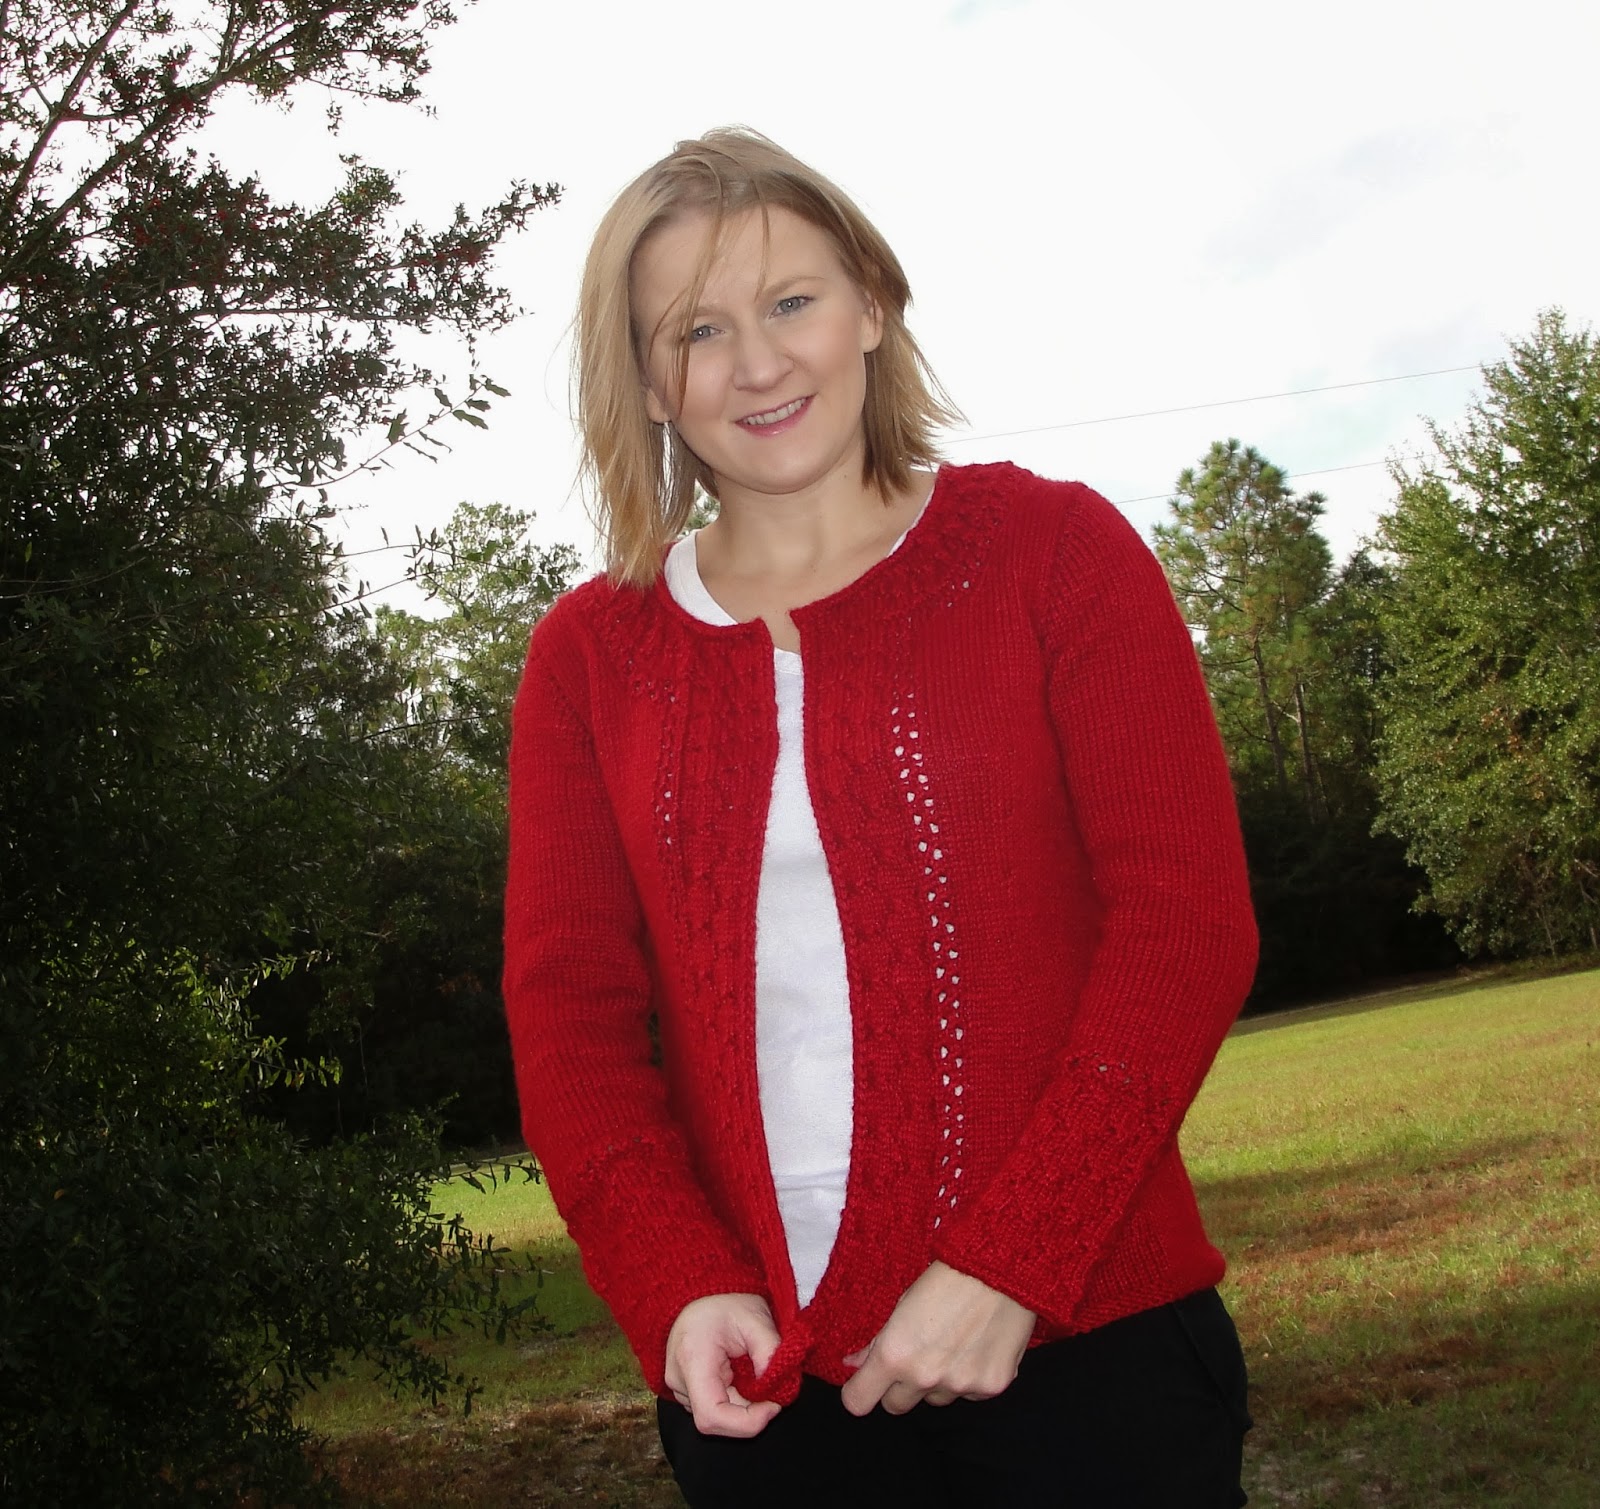
AKC: FO: Alexandria Cardigan

"Alexandria Cardigan"
I finished my Alexandria Cardigan last week.  It used just short of 8 skeins of Knitpicks Gloss DK in Cranberry.

It was another crazy-windy day.  I need to get my hair cut too.  Hopefully that will happen next week.

I think this is the most perfect shade of red.  

Here is the detailing of the cardigan.  This cardigan is perfect for me.  It's the right length, width, everything.  I normally have problems with the sleeve caps being too tight in the biceps, but not with this one.  The only thing I would change is I would prefer to have a closure of some sort.  I am considering adding a zipper for that purpose.

I've been mostly out the last week.  I just returned from Savannah where a few of my friends ran the Rock 'N Roll marathon.  I was being supportive (and I love Savannah!).  Ryan ran the marathon in 3:15 (unofficially) and convinced me to run a half-marathon in Panama City Beach next month.  That means I have to go essentially couch to 13.1 in 7 weeks.  What have I gotten myself into?

Tuesday, November 5, 2013

Fashion Plate: Fruit Cart Dress

Make This Look: ModCloth Fruit Cart Dress

Make This Look: ModCloth Fruit Cart Dress by ellelittle featuring dresses

ModCloth has this style dress in several different fabrics.  I chose the Fruit Cart Dress for this week's Fashion Plate.  To create this style, grab yourself a copy of McCall's 6350 (now out of print, but still widely available) and 3 yards of Michael Miller's Farmer's Market Apple Dot fabric.  The ModCloth version has shirred side backs, which you can easily recreate.  You will need to double the width of those pieces because shirring reduces the width by approximately half.  Then you can just follow any shirring tutorial, such as this one by Flossie Teacakes.  I just love the sweetheart neckline on this dress next to the apple print.  It's just perfect!

Friday, November 1, 2013

Freezer Friday: Happy Ending Ice Cream (Chocolate Stout)

 I finally made the chocolate stout ice cream!  I made mine with Sweetwater Happy Ending, an imperial stout with notes of cocoa, roasted malt, and vanilla.  The beer pours heavy with a medium body.  It has a creamy mouthfeel and is highly drinkable in spite of the high alcohol content.  This is one of my favorite beers.  It's a seasonal, available sometime around January.  Sweetwater has been a bit ahead lately, so maybe I'll get to restock this beer in November.  I'm down to one now, which might need to be another batch of ice cream.  This stuff (the beer and the ice cream) is so good!

 Happy Ending Ice Cream

(I forgot to take a cast of characters photo, so just follow along.  As usual, I will post the recipe towards the bottom of the post.)  Whisk 4 egg yolks together in a small bowl.
  
Heat 1 cup of milk and 1/2 cup sugar in a small saucepan over medium-low heat.  It is warm enough when bubbles being forming around the edge of the pot/pan.

In a medium-sized bowl, melt 1.25 cups chocolate chips.  I used Ghiradelli 60% cacao bittersweet chips.  You want to use the best chocolate you can find (within reason, of course).

Here they are all melted.  It took about 90 seconds in the microwave, but I whisked the chips down every 30 seconds to keep the chocolate from burning.

 Whisk the warm milk and sugar into the egg yolks until thoroughly combined.

Strain the milk/egg mixture into the melted chocolate.  Straining is important!  You don't want egg chunks in your ice cream.  Straining is gaining.  Or braining.  Or something.

Whisk in 1 cup of heavy cream and 2 teaspoons vanilla.

And now for something completely different...add in beer!  You only need 3/4 cup, which is exactly half your bottle.  That means you have to take one for the team and drink the other half of the beer.  I know.  It's amazing, right?  Obviously I'm singing praises to the beer gods for bringing me Happy Ending, but don't feel like you can't make this ice cream  if you don't live in the southeast like me.  You can use Guinness (blah), Dogfish Head World Wide Stout, New Belgium 1554, and countless others I'm too lazy to think up right now. 

The carbonation in the beer will make your ice cream base magical fizzy.  Please allow the base to chill in the fridge for several hours or overnight.  Once it's properly cold, churn the base in your ice cream maker according to the manufacturer's directions.  Scoop.  Eat.  Sigh with pleasure.  Tell your friends.  Eat the rest of the ice cream without sharing.  That last one's just me?  Well. . .

I thought photographing the ice cream in a Sweetwater pint glass was appropriate.  Don't you agree?  I need to share this on the Sweetwater blog.  I think they'll like that.

See those amazing flecks of chocolate?  It's a nice bonus when you shove a spoonful in your mouth. It's kinda like the coffee grounds in the bottom of your cup at the fancy coffee places, but in a good way.  Not in the "crap, the filter fell down AGAIN" way.  And the chocolate melts.  Bad example?  Here's another picture to distract you from my nonsense:

This pint glass is from the 420 festival last year.  420 is Sweetwater's flagship brew.  It's a pale ale, but it has more hop than Bud Light or Miller Light do.  OHGAWD.  I can't believe I just wrote those words down.  Ick ick.  Why people drink that stuff I just don't understand.  Sweetwater 420 is much better and it's only $1 more a six-pack.  


Ice cream.  I ate a bunch already.  I need to control myself.

So..."Don't Float the Mainstream" and make yourself some Happy Ending Ice Cream!

Happy Ending (Chocolate Stout) Ice Cream

Ingredients:
1 cup whole milk
1 cup heavy cream
4 egg yolks
3/4 cup Sweetwater Happy Ending (or other stout) 
1.25 cups chocolate chips (the darker, the better)
1/2 cup sugar
2 teaspoons vanilla

Preparation:
Heat 1 cup whole milk and 1/2 cup sugar in a small saucepan over medium-low heat until it just begins to bubble on the edge of the pan.  While the milk/sugar mix is heating, whisk egg yolks in a small bowl and set aside.  In a medium bowl, melt chocolate chips in the microwave.  This will take about 90 seconds, but stir the chips every 20-30 seconds to keep the chocolate from burning.  Once the milk is bubbly on the edges, whisk it into the egg yolks.  Next, strain the milk/egg mixture into the melted chocolate and mix thoroughly.  Add in the vanilla, heavy cream, and Happy Ending and whisk until combined.  Allow the ice cream base to chill thoroughly before churning it in your ice cream maker according to the manufacturer's directions.

Enjoy!