Wednesday, January 30, 2013

Wednesday Woecakes! Or the things I'm lusting after

Who here loves ModCloth?  ::me!me!meee!:: ModCloth is just filled with inspiration if you are a sewist/crafter/lover of vintage things.  I saw this dress and I absolutely love it!  It's so much fun.  I love the swiss dot details on the mesh.  I love the starfish and shells embroidery.  I love the illusion neckline.  I love the pleats.  I would be seriously tempted to drop $125 on this dress, except it doesn't come in my size. :(  That's okay, though.  There are plenty of patterns that have this neckline going on (Simplicity 4070 comes to mind) and the skirt is easy enough to replicate.  I'll be ready to make my own version when the right fabric comes along!
Seashell We Dance

Gertie's New Book for Better Sewing
To be honest, I'll probably have purchased this book by the time this post goes live.  Just sayin'  Have you been to Gertie's blog? If not, don't.  You will fall into the abyss. (Kidding, kidding.  There is tons of great info on the blog.)  The book is packed with couture techniques and 10 patterns for wardrobe essentials, updated from the 1950s version for the modern lady. 

The Sophia carry-all bag by Amy Butler
Another design I love.  I think I would make this in a really fun Michael Miller or Alexander Henry print.  I do love those pin-up girls.
Pin Ups Aloha Girls
Yeah.  The root beer float.  I stopped drinking soda a few years ago.  Every now and then I crave root beer hard.  I might break down and have a glass at the superbowl party this weekend.  We'll see.  Speaking of the superbowl party, I'm making bacon cheese twisty things and maple cheesecake cupcakes with candied bacon.  The latter is only if I have time.  I have a basic cheesecake ratio that I use and I'll have to tweak my recipe a bit when I add the maple syrup.  I'll probably end up adding flour when I add the maple syrup to keep the right consistency.  Hey, potential new recipes for you guys to look out for!

Happy hump day!
~elle


Monday, January 28, 2013

Sew Bi-Weekly Update and Souvenir Fabric

It's Monday again and time for another update on my sew bi-weekly progress.  I decided that I'm not going to do the red challenge for February 11th.  The whole point was something red for Valentine's Day.  I just made a red skirt.  I don't have any more red fabric in the stash.  I decided my time was much better spent making my blue silk dress truly fabulous.  There are portions of the dress that I couldn't reach with my sewing machine when I was understitching, so I am going to go back and hand stitch those areas.  If I don't understitch those sections, the lining will poke up from the silk and I really don't want that happening.  I'm using a smoky grey bemberg rayon to line a bright turquoise dress.  It just won't look right!  I'm also trying to create something couture in a way.  The fabric was quite expensive and I don't want to waste it by creating a sub-par garment.  So--onward!

I also want to share with you all the fabric goodies I brought home with me from Nicaragua!  I looked for fabric shops in every country I was in and Nicaragua was like Mecca.  There were fabric shops everywhere I looked!  I picked up bunches of fabric.  Let me show you all of it!

This is the first fabric that caught my eye in Granada.  The store I bought it from has ready-made dresses (mostly for children) that people can purchase.  I was walking towards the market in Granada and BAM!  fabric store.  The fabric is an embroidered cotton.  I picked up 2.5  yards for 65C per yard, so that's about $6.75 total.  Bargain!  I think I'm going to make a fun summer dress using the borders as my hem and bodice top.  Maybe.  Do you have any pattern suggestions for me? 


I found this embroidered cotton at the same shop.  It just has a subtle allover circle pattern embroidered on it.  I only picked up 2 yards of this fabric because it was quite expensive at 100C per yard, or $8.25.  This fabric is destined to be a summer dress.  (I live in Florida.  I'm allowed to have a bazillionty dresses!)


The last fabric I picked up at that shop is this poly/rayon/cotton mystery blend.  I'll have to do the burn test on this guy.  I think it's a poly/cotton blend, but I'm not certain.  The blue is actually a bit deeper than the color my camera picked up.  This will probably be a summer dress too.  :D I bought two yards at 50C per yard, or $4.25 total.  Even though I didn't make it to Costa Rica, I still managed to bring something home from there--this fabric!


Some of you have probably guessed my color palette by now.  I bought this at one of three (three!) fabric shops along a three block stretch on the main street in Masaya.  I was told that it is hard for the shops to get natural fibers.  You will see lots and lots of polyester (which I think is pretty icky) and very little cotton.  However, I managed to snag 2 yards of this for 60C per yard, or $5.
I saw this dark blue denim at another fabric shop in Masaya.  I passed on it the first time because it was 75C per yard and only 75% cotton (at least that's what I heard).  I thought about it overnight and decided that I wouldn't be able to find denim anywhere in the states for that cheap and this would be good for practicing making jeans with.  I just purchased (for 19.99!) and started watching the Craftsy class Jean-ius.  It looks so complicated, but I have such a hard time finding jeans that fit and my favorites are getting worn out.  I bought 4 yards of denim from that store for a total of $11.50.  The denim ended up only being 70C per yard.  They might have given me a discount because I bought so much of this next fabric.
This is 5 yards of a deep, dark blue suiting.  I love the slight texture it has.  It claims to be wool, but I don't know I believe that.  I'm pretty sure it is just a nice polyester (again with the ick!, but I'll line it with bemberg and be okay with this).  I'm shooting for a jacket and pants with the 5 yards I purchased for 100C per yard, or $20.  Ouch!
That's what I did on my vacation.  Fun times and fabric shopping!  Using today's exchange rate, I spent $56.43 on fabric.  Don't even ask me how I managed to get all this fabric back home.  That is a whole different story.  It involved lots of prayers and shifting things around in and between my backpacks (I bought a small one in Belize to use as a daypack).

Can you believe another month is almost gone?  I think I'm on three months of blogging now. Hopefully I won't run out of things to say!  That will probably never happen.  I talk to everyone like my best friend.  If you ever meet me, you will find that out pretty quickly!  I'm off to work for a bit now and then thread the needle.  I need to get this silk dress finished up.  It is looking fantastic!  I can't wait to show you guys.  Have a great week!

~elle

Friday, January 25, 2013

Freezer Friday: Basil Pesto Chicken Stuffed Shells

I'm starting a new weekly series on my blog called Freezer Friday!  Every Friday, I will share a freezer-friendly recipe or related tip with you.  Sometimes it's hard to fit cooking a good meal into my already busy schedule.  I started freezer cooking about 18 months ago and it drastically changed my life.  I eat better, healthier, tastier food.  I spend less at the grocery store.  I rarely eat out.  Freezer cooking is just a perfect way for me to ensure I always have something (almost) ready-made to grab and enjoy.

The first recipe I'm going to share with you is for these yummy basil pesto chicken stuffed shells.  I finally added a better photo.  It took me 10 months, but I did it!  The shells still taste just as good when I first made them.


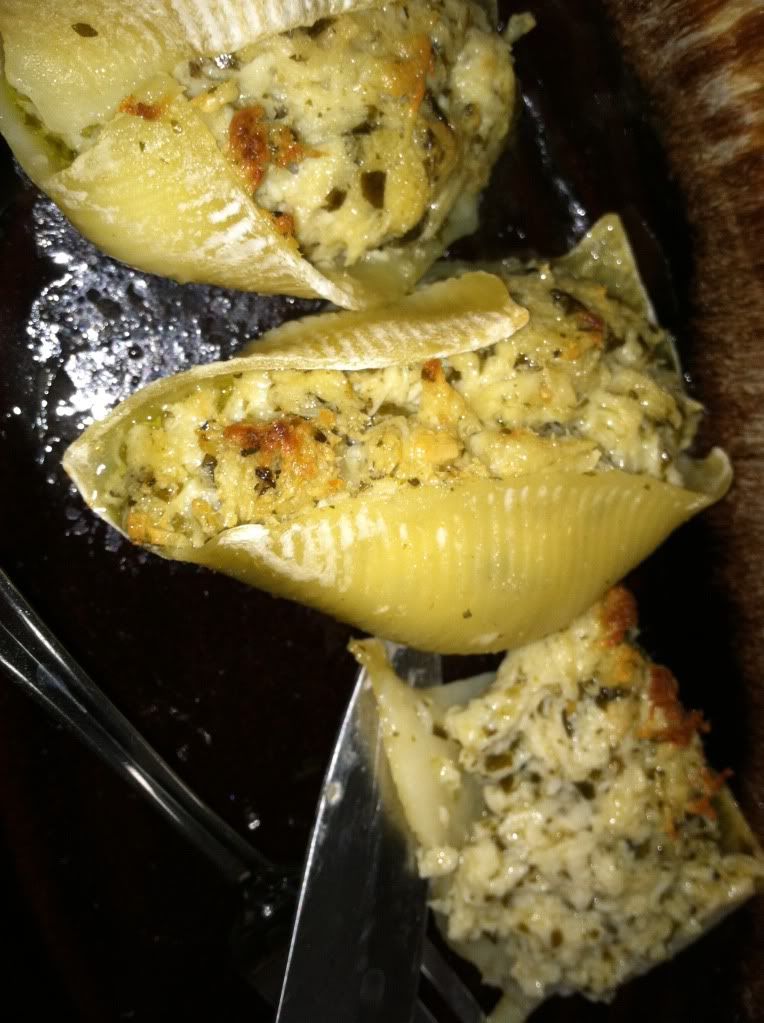
I'm leaving the crappy iphone photo up.  It's kinda all over pinterest now.

Let's get cooking (or prepping really--since this is for the freezer)!  
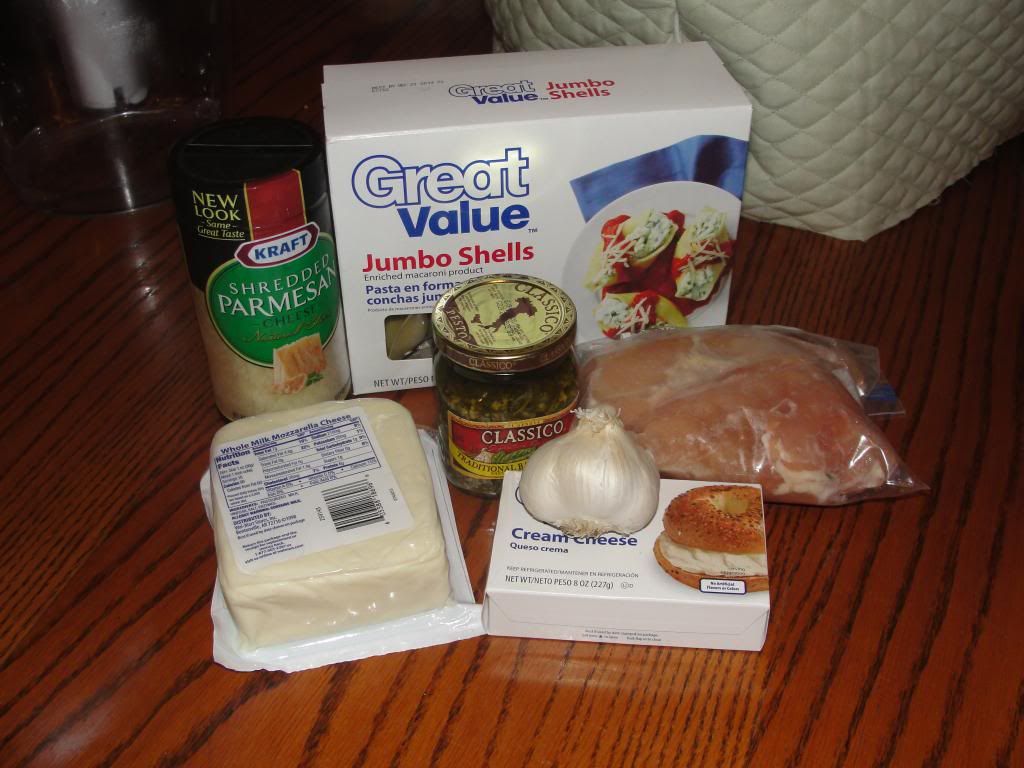
Cast of characters:  jumbo shells, Parmesan cheese, mozzarella cheese, basil pesto, boneless skinless chicken breasts, cream cheese, and garlic
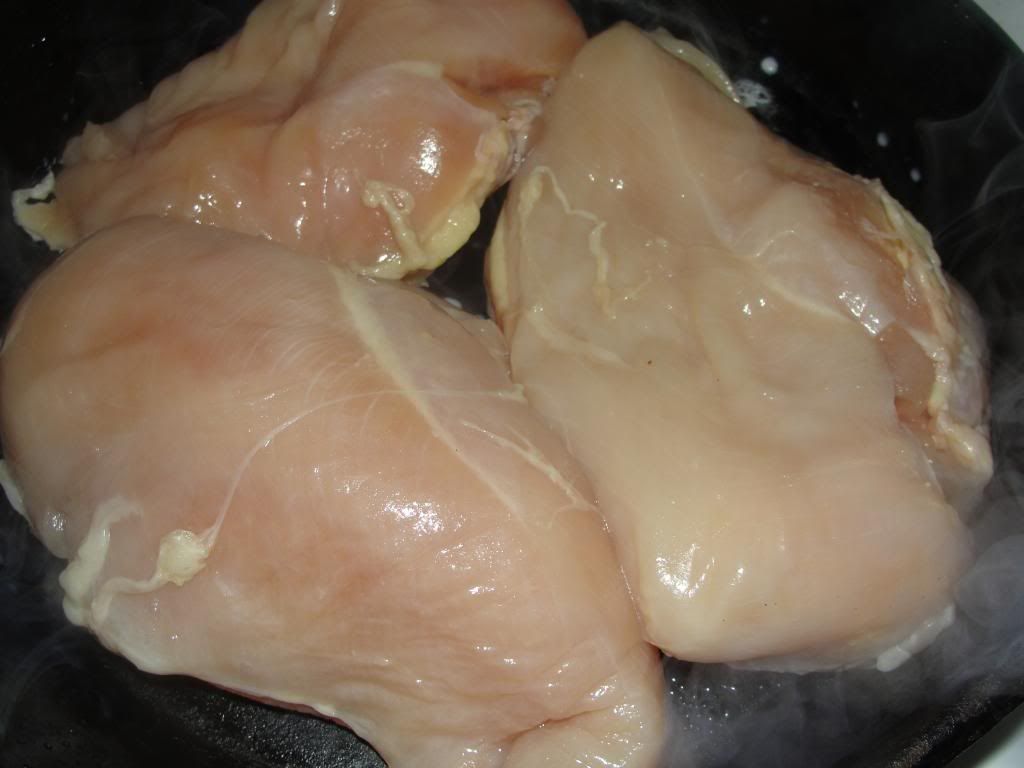
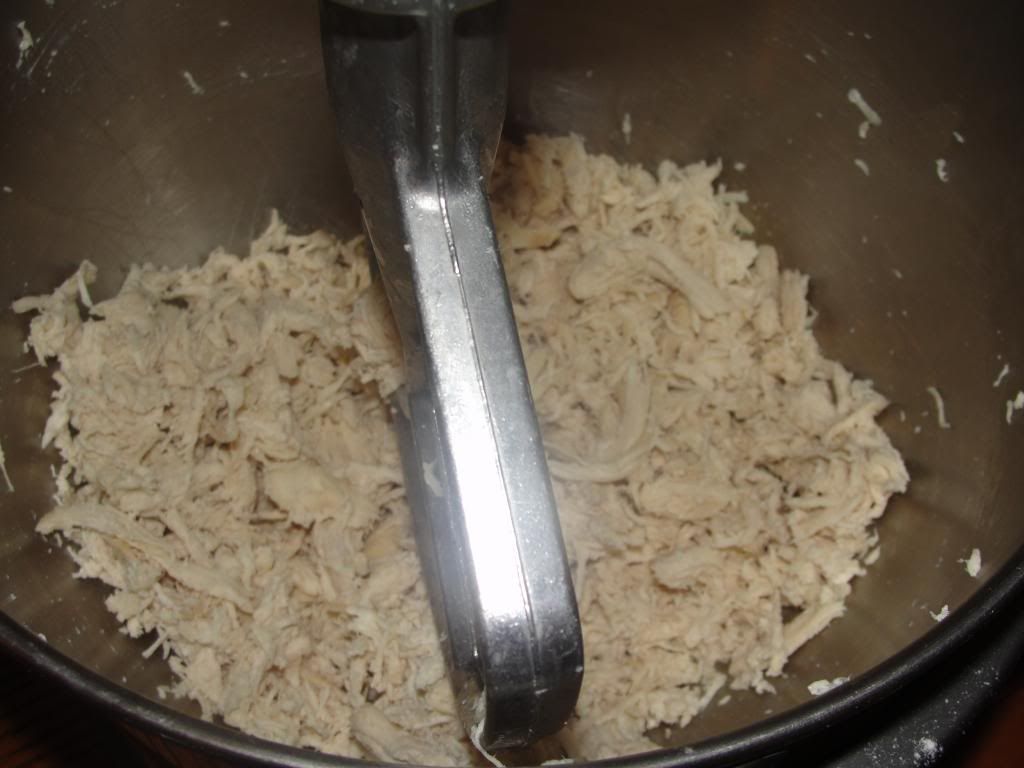
Three chicken breasts in the pan (that's about 1.5 pounds).  Cook 'em up.  I sort-of steam cook my chicken.  I use a cast iron pan, put the burner on low, and cover the pan with a lid.  It's okay if you don't fully cook the chicken because it gets cooked again later.  While you are by the stove, grab a pot and boil the shells.  I forgot to take a picture of that step.

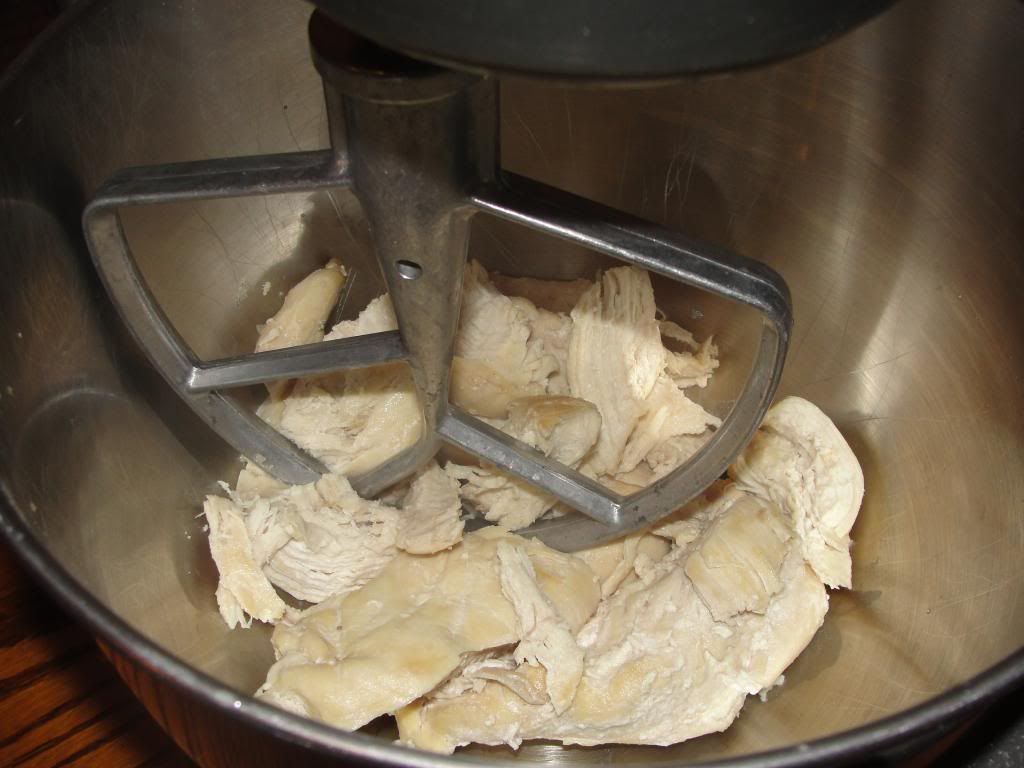
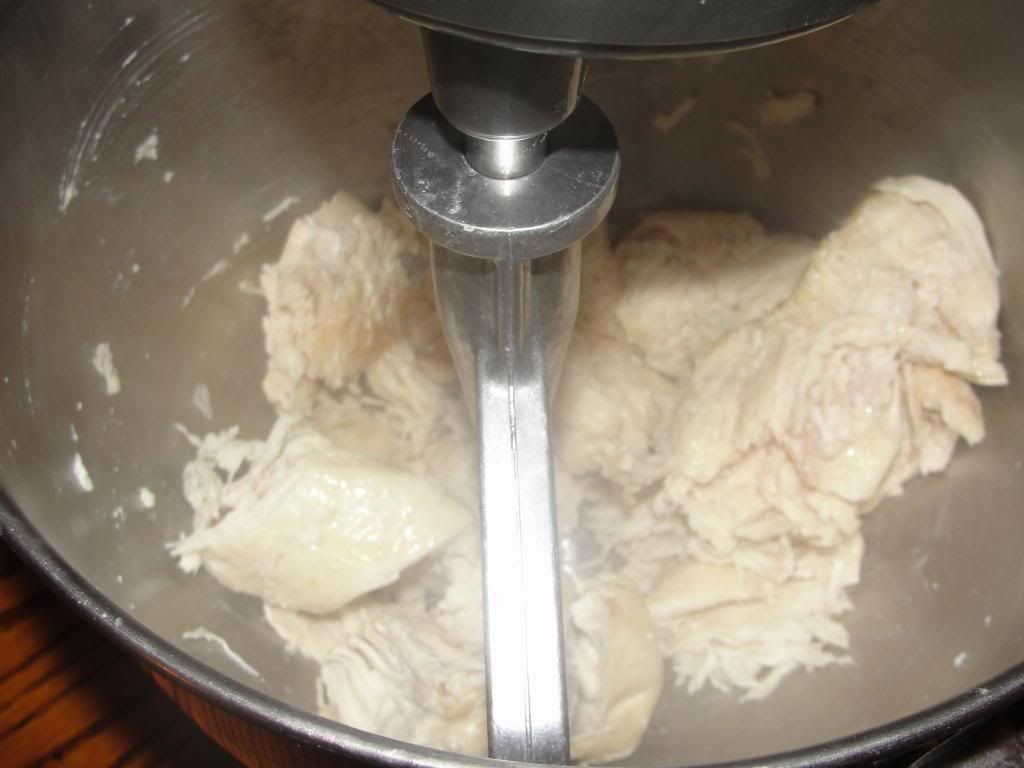
Put the cooked chicken in your stand mixer/food processor/whatever
Add the paddle
Start the mixer
After a minute, you have shredded chicken!

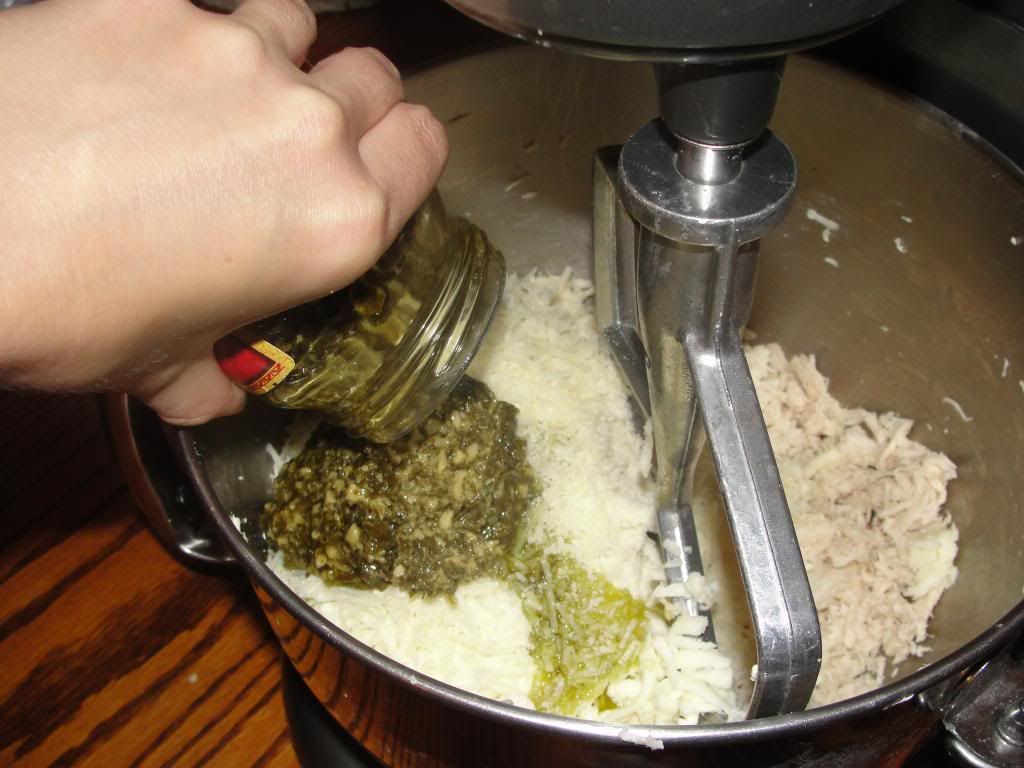
While the chicken and pasta are cooking, shred the mozzarella cheese.  I always buy block cheese because it takes minutes to shred myself and it's cheaper.  I'm all about saving money where I can.  You also need to chop up the garlic--about three or four decent-sized cloves.  Don't forget the garlic. 
Add the mozzarella, Parmesan, garlic, and basil pesto
Add the cream cheese
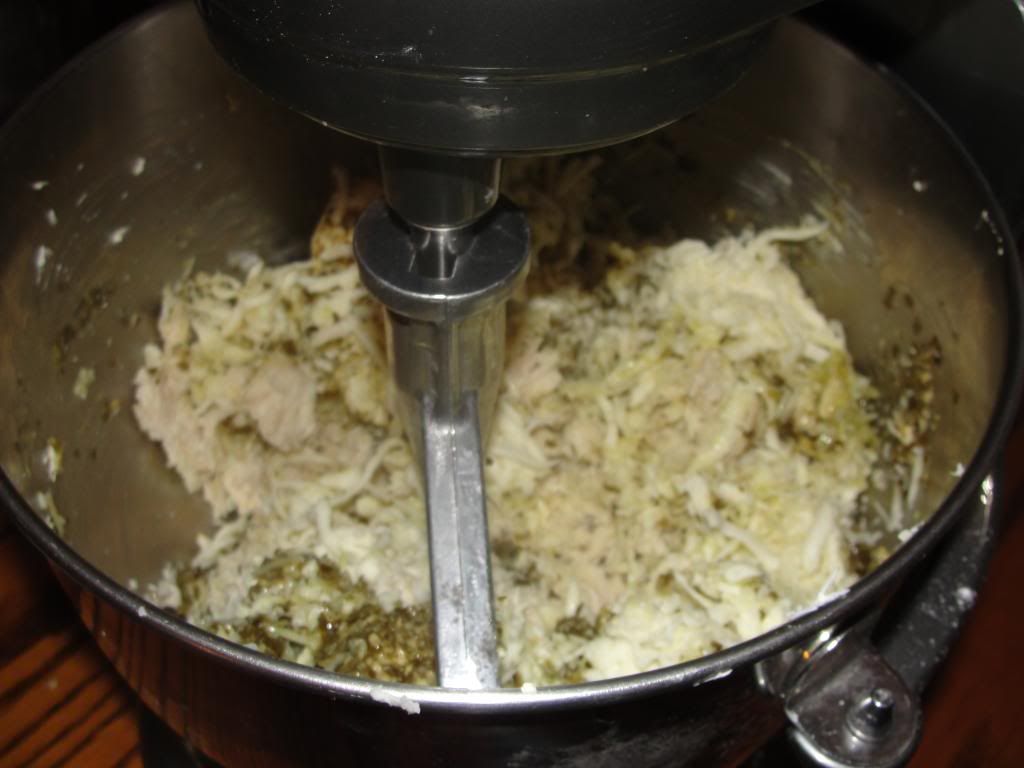
Mix everything together.  It will look funny and someone will probably walk past and say "Eeww, gross!"  Just trust me on the deliciousness.
After all the ingredients are thoroughly incorporated, grab the shells (again I forgot to take pictures!) you cooked and drained and use a spoon to fill them with the mixture.  If you follow my recipe, you will have exactly enough to fill all the shells.  I generally have 42 shells total in the one pound box.
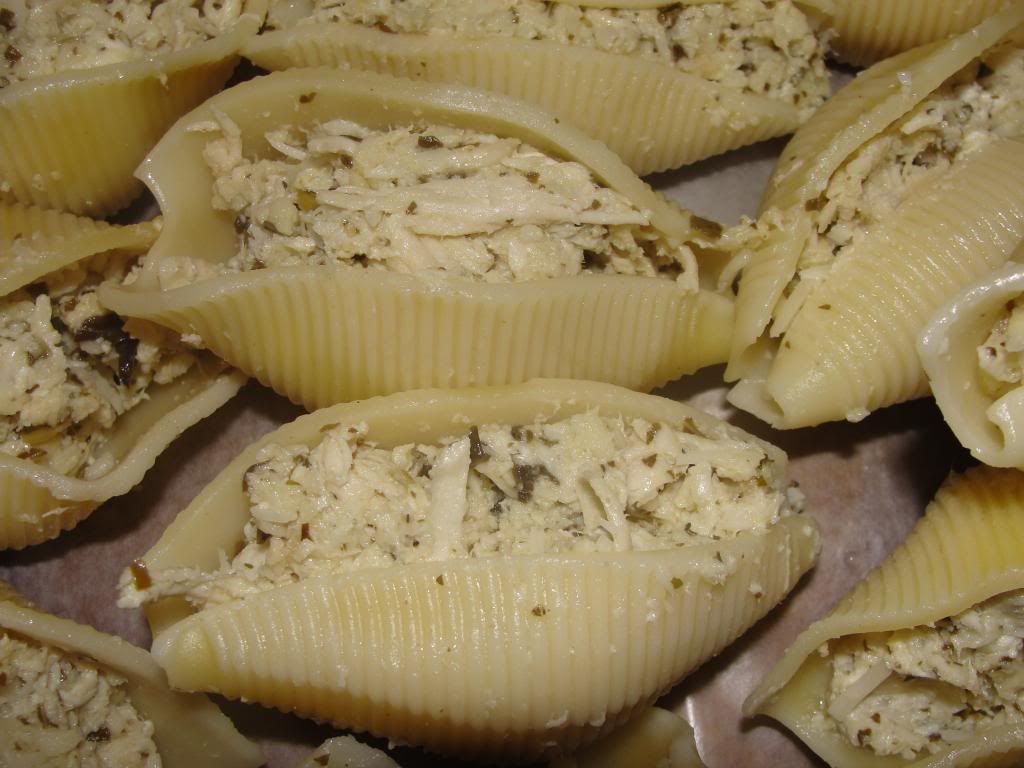
Close-up!  So much noms all in one place!


The innards spilled out of this one when I lifted it from the baking dish.  Oops.

Cheesy olive-oily basily goodness.
Remember that tip I gave you for the cookies from over here?  Use that same flash-freezing method if you are going to be freezing these shells for future consumption.  After the shells have some cool-down time in the freezer, you put them in a freezer bag, write the date and contents on the white space, and put the bag back in the freezer.  Easier than pie, right?  When you are ready to cook the shells, preheat your oven to 350° and bake uncovered for about 30 minutes from frozen.  I typically only bake 3-4 shells at a time for myself at work, so I really can't speak for the amount of time it would take to bake the entire recipe from frozen.  I would guess just cook the shells at 375° for 30-45 minutes and that would be fine.  

**Lots of people on the internet have commented that the shells become hard during baking.  I've never had that happen unless I've completely forgotten about my food in the oven and overcooked it, but I do want to address the issue.  You could cover the baking dish with foil to keep the moisture in, cover the shells with loads of cheese before baking, or even add some milk to the baking dish to up the moisture content.  Also, keep your eye on the oven.  You may not need to cook it for the full 30 minutes--15 to 20 minutes may be fine for you and your oven.**

I hope lots of people enjoy this series and the recipe.  I promise it's delicious.  I'm one of those people who believe life is too short to eat food that doesn't taste good.  Leave me a comment and let me know what you thought of the recipe!  Have a great weekend!

For a printable version of this recipe, click here.  (recipe will open in a new window)

Basil Pesto Chicken Stuffed Shells

Ingredients:
1.5 pounds boneless, skinless chicken breasts (about three whole breasts)
1 one pound box jumbo shells
1 pound mozzarella cheese, shredded
1 cup Parmesan cheese
4 oz cream cheese
1 8oz jar basil pesto (or one cup if you choose to make your own sauce)
3-4 cloves garlic, minced

Cooking Instructions:
Boil the pasta shells according to package directions.  Drain and allow to cool for safe handling later.  Cook the chicken breasts until no pink remains and shred the meat in a stand mixer or similar kitchen appliance.  Add the rest of the ingredients and mix to thoroughly incorporate all the ingredients.  Spoon the chicken and cheese mixture into each shell.  Arrange the filled shells in a baking dish and top with additional mozzarella cheese, if desired.  Bake at 350° for 30 minutes, or until the cheese is melted. 

For the freezer:  once the shells are filled, place the shells on a baking sheet covered with wax paper and flash freeze.  Once frozen, put the shells in a freezer bag.  From frozen, bake at 375° for 30 minutes.  (As mentioned in the post, I only bake 3-4 shells at a time from frozen and at 350° for 30 minutes.  The cooking time for the full recipe is estimated based on past experiences.)

Monday, January 21, 2013

FO: Red Skirt (Sew Biweekly Challenge)

I'm a week late, but I finished my skirt for my first sew biweekly challenge!  I had 30" and some random pieces of a red cotton sateen I picked up last summer.  It's a nice fabric to work with.  It's got a little stretch to it, but not too much where it's annoying.  I really think the fabric turned out a polished finished object and I look forward to wearing it when it warms up outside.  Stupid cold weather!

Pattern:  Simplicity 2451, View C, $1
Fabric:  Red cotton sateen from JoAnn's, $5/yard and I guess I used a yard total
Misc Notions:  zipper, $2 and thread, $1
Here's the front with my shirt untucked (probably how I'll wear it)

I may be blurry, but at least I have pockets!

Still too short to be a supermodel?  Darn!

Reason 682 I love being able to sew my own clothes:  I often have a higher hem in the back than in the front on ready-made garments.  This is because I have a butt that is kinda out there.  The hem difference was significant on this project.  I ended up grading (is that the right word--I'm not sure) up the hem about 3/4" on the front, so my hem is 1.25" on the back and almost 2" on the front.  Now my skirt looks fabulous!

I'm glad I did this project.  It had so much hand sewing, but I really love the way it turned out and I think I'm going to add hand-stitched hems to a lot more projects in the future.  It just looks so clean.  I can see where I got more comfortable with my hand sewing because my stitches became more even along the hem.  I think I'll get it perfect in time!  (Excuse my dirty wall.  My dog lays right there all the time and I'm at the point where I've washed that wall so often I'm rubbing the paint off!)  I had to get pictures of my shoes on this post too.  They are probably my favorite pair of shoes and it shows.  They remind me of the old style Prada shoes.  I love them!  They will be worn with this skirt a lot.

Now I have to get working on my next challenge project.  Eeep!  I think I'm going to try to finish up the turquoise silk dress.  A hand-stitched hem is in order.  :)

Thursday, January 17, 2013

Sew (Bi)Weekly

I have been following the Sew Weekly website off and on for a little over a year now.  It's so interesting to see how the different contributors take to the theme and create something so unique every single week.  I dreamt I would someday have the motivation to participate in a project of this scale.  I have so many projects I want to make.  So much fabric.  So many patterns.  Sometimes, however, I just don't have the motivation.  I'm putting this out in the blog world for a little accountability.  I came up with a plan to just have a FO bi-weekly.  I came up with a list Sew Weekly style and I really hope I can make it through the end of the year.  Without further ado, here's my list:

Jan 14  - Skirt
Jan 28  - WIP
Feb 11 - Red
Feb 25 - WIP
Mar 11 - Polka Dots
Mar 25 - Plaid
Apr 8   - Infinity Dress
Apr 22 - WIP
May 6  - Pants
May 20- Apron
June 3  - Yellow
June 17- Favorite Pattern
July 1   - Red, White, & Blue
July 15 - Silk!
July 29 - Colette Pattern
Aug 12 - Separates
Aug 26 - Black & White
Sept 9  - 1950s
Sept 23 - Beads
Oct 7   - Suit
Oct 21 - Stashbust
Nov 4  - Coat
Nov 18 - WIP
Dec 2   - Gift
Dec 16 - Green
Dec 30 - Holiday Dress (Glitter, Cocktail Party, etc)

As you can plainly see, I'm already a few days behind.  I'm working on a red skirt right now.  My hand-stitching skills leave something to be desired.  It's a painstakingly slow process for me and I have to hand-stitch the hem and the waistband facing.  I put in my planner to have this done by saturday.  We'll see!  I have some WIP weeks in here as well because I do have several of those.  I still need to finish up my gorgeous turqouise silk dress and my blue-green parfait.  Those two projects are really what the WIP weeks were made for!

Let me know if you are up for the challenge as well!  I would love to have the company (read:  accountability partners).  Just leave me a comment right down there! I will also accept your comments of "Elle, this is crazy-making, but I wish you luck this year!"

Wednesday, January 16, 2013

New Year, New Plans

Someone I met on my travels sent me a facebook message asking me how real life was.  Honestly, real life is hard.  I forgot how busy I am all the time.  I already double-booked myself twice since returning home.  I was able to work around both events one time, but I had to cancel on the  second occurance.  I hate canceling on people.  Part of the problem is that I committed myself to events before I left for vacation and forgot about them in the meantime.  This forgetfulness is a recurring theme in my life lately and I don't like it.  It's been years since I needed to put anything down in a planner, but I decided that I really needed one to get my life back in order.

Here are the makings of my nonfancy planner:
A 5.5" x 8.5" binder ($6 at office depot)
Oaktag (had forever) covered with scrapbook paper ($0.60 for 8 sheets) as section dividers
double-sided planner pages I printed out

graph paper because I ♥  it
double-sided pocket things which I will find a use for ($2 at office depot)
That's just the start of my planner.  I already feel better knowing that if I write something in it, whatever it is will always be there and it's my own fault for double-booking or missing an appointment or not getting some very important thing done or not managing my time wisely or WHATEVER. 

I literally just put this planner together last night and this morning, so I still have a lot that I want to do with it.  Here's where I'm starting:

Daily Sheets: I got mine from here.  I'm going to try this version for a few months and decide if I want to revamp the style or add anything else.  I would love color on these pages.  Gray is so very boring.  I had a close runner-up, but I don't have the link on hand.  That one was a little too busy for me and I decided I didn't love the layout.
Note paper:  I will end up putting some kind of notepad in this thing
Graph paper:  I think my love of graph paper is all I need to justify this
Budget:  I have an amazing budgeting spreadsheet on my computer.  The problem with this is that it is not with me.  When I was in college and poor, I used to keep all my weekly budgets on index cards and keep them in my wallet.  When I spent money, I wrote it on the index card.  I kept track of my money like this for years.  Did I mention I'm an accountant?  Anyway, I need to come up with something to keep in my planner.  I'll poke around on the internet and see what I come up with.
List of crafty things:  I'm not really sure why I need this in my planner, but it seems like a good idea.  I think it would help me keep my sewing plans on track and keep my already stretched-thin time in check.
Freezer inventory/Meal Plan:  Knowing what's already in the freezer will make it much easier to put together my shopping list.  Plus, I can get real about what's actually in there and make sure I keep the things easier for me to prepare in there.  I find that I really like stir-frys.  I can quickly prepare many varieties to put in the freezer.  When I need something to eat, I pull one out of the freezer in the morning and cook it up in the evening.  Delicious dinner for the night and leftovers for lunch at work for the next two or three days.  It's perfect for me.

So, personal planners.  Do you have one?  What sections do you keep and why? Leave me a comment and let me know!

(Also, I promise I'm working on getting loads of blog posts from my vacation ready to put up.  I am waiting on some pictures from one of the other people I was traveling with.)