Showing posts with label simplicity. Show all posts

Monday, December 23, 2013

FO: On the Job Dress

"On The Job" Dress


Just the Facts:
Fabric:  about 2.5 yards each of quilting cotton and poly/cotton broadcloth from JoAnn's  $11.75
Notions:  Thread from stash, zipper
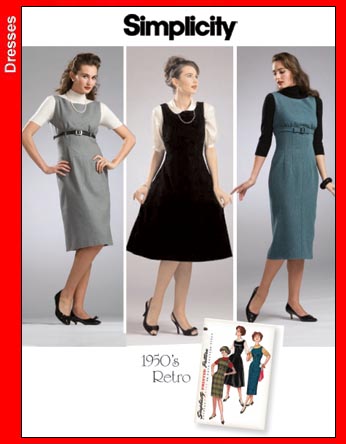
Pattern:  Simplicity 3673, View C 
Year:  1950s reprint
Time to Complete:  I stopped keeping track
First Worn:  December 9, 2013
Wear Again:  yes again and again and again
Total Cost:  $15.00 including the pattern 

This dress has actually been finished for a couple weeks.  I made two attempts at taking FO photos and I'm not really thrilled with either effort.  I am, however, totally in love with this dress.  I spent so much time making it exactly right.  I wanted pockets.  I added pockets.  I wanted a collar.  I made a collar.  I wanted sleeves.  Yup.  Got some sleeves.  I think with a couple-few more tweaks, this will be a great contender for a TNT dress pattern.

The fabric is navy with green geometric patterning.  It's circles and diamonds.  I thought the fabric was quite light and possibly sheer and wanted to underline it.  This created a fabric that I think is the perfect weight.  I wanted to line the fashion fabric with batiste, but couldn't find one in navy blue.  I went with the poly/cotton blend because I actually liked the hand for underlining.  

The skirt isn't twirlable as much as I try.  It's only a four gore skirt.  The waist shaping is achieved by sewing 6 darts per front and back.

I got one hand in my pocket and the other hand's in the other pocket.  Alanis would not be pleased with my rendition of her song.

I did move the bust gathers in a half inch and they ended up in the proper location on the boob line.  That is always a plus.  :) The pockets I put on this dress are my favorite so far.  They are completely invisible.  I used the pocket piece from Simplicity 2444 and pinned the pocket to the skirt front when I was holding the pattern pieces against myself.  Totally unscientific, but it worked.

This dress certainly gives the illusion I have actual curves.  I tend to think I'm quite celery-shaped.


I think this photo is accurate of the fabric color.  From a distance, the colors blend so nicely that it creates a lovely shade of teal.  

This is part of photo session take 2.  You have no idea how cold I was.  The frost had just melted off the ground.


See?  Cold.  I am showing off my fancy new gold shoes!  Off topic:  I bought a pair of black satin pumps from Dilliards years ago.  I love those shoes so much.  I went looking for another pair of shoes from the same company, but I wanted a nice neutral gold tone.  These are the perfect new shoes to go with my (almost) perfect new dress.


I used the cap sleeve from Simplicity 2444 as well.  Heavily modified, of course.  That's my style lately--modifying the crap out of things.  Let me explain how I modified the sleeves to fit my arms.

First I got a new piece of freezer paper.  I drew a slash line at the half way point.  Keep in mind that the back of the sleeve is longer.  That's why the line looks "off."

You can see here that I made myself some notes on the pattern piece.  I previously adjusted the armscye and the sleeve had to be adjusted by that much as well.  Actually, if you are mixing pattern pieces over different companies, it's a good idea to measure your armscye and sleeve cap to make sure they "match" before sewing them together.  Just like it sounds, I take a flexible tape measure and measure each pattern piece.  It is normal for the sleeve cap to be slightly larger (1/2" or so) because you ease the cap to the shoulder.

Anyway, back to the point.  I adjusted my armscye by 3/4", so I needed to add that much to my sleeve cap.  I put little marks on each side to reflect that adjustment.  Then I carefully spread my cut point until it matched the finished measurement I needed.  I ended up with a sleeve measuring 15.25" including the seam allowance.  I taped the slash down so it wouldn't move while I traced my old sleeve onto the clean sheet of paper.  I had to true up the bottom of the sleeve and mark the new grainlines and that's it.  Easy peasy.
Here's my new sleeve, nice and pretty.

Notes are good.  I will be making this S2444 eventually and I want to make sure I don't make more work for myself down the line.

My pretty pocket.  I cut both both pocket pieces out of the navy broadcloth.

  
I serged all my edges.  Don't they look lovely?

  
The dress zips up the back with a lapped zipper.  The way one sews in a lapped zipper requires one to baste the zipper opening closed first.  As I stitched further down the 22" zipper, the fabric biased more and more as I fed it through my machine.  I don't know how to keep that from happening again.  You can tell the lap is obviously biased, but I can't see back there, so whatevs.

I understitched my collar to keep the seam allowance down and to keep that nice collar stand.

As far as how it looks compared to the look I was going for?  I give myself an A-.  I missed some of the design details with this attempt, but the dress is a definite win overall.  What do you think?


Wednesday, December 11, 2013

WIP: On the Job (still)

 How about a photodump?  I made lots of small adjustments to the OTJ dress.  Let's see:

I had to make 2 darts on the back neckline.  I pulled an inch out on each side, tapering down over about two inches in length.  I learned while working on my Laurel top that neckline darts are supposed to point towards the armpit area.  I think I accomplished that.


Inside view of the neckline dart.  I would have preferred to take the fabric out of the pattern itself, but I just wasn't seeing a way to make that happen because I didn't have anywhere to add length on the side of the pattern.  The bodice cuts off right under the bust and I didn't want to play with the fit of that in order to pull the neckline fabric out.   You may also be able to see that my shoulder seam looks funny?  I pinned about 1/2" in on the seam specifically for collar drafting purposes.  In order to get the collar to have a little "stand" to it, you need to overlap the shoulder seams by about 1/2" on the armpit side.  It works, I promise!

Sorry for the blur.  Drafting a collar was easier than I thought it would be.  I put a tiny nip in the seam allowance at the center front to tell me where to stop tracing my outline.  After that, I simply traced the top line of the garment, noting where the center and shoulder seam was.

Here's what the line looks like.  It looks rough, but your pattern doesn't have to look fancy.  It just has to work.

My next step was deciding how wide I wanted the collar.  I settled on 1.5" and used an adjustable seam gauge/ruler thingy to make those markings.  I put a dash about every inch or so along the pattern and trued it up as I went.  See that wonky curve?  I didn't like the first line and I redrew it.  Legit.  The last thing to do before cutting the fabric is to add a seam allowance.  I used a 5/8" seam allowance for the rest of the garment and that is what is built in to the neckline pattern (it was supposed to have a lined bodice), so that's what I added to my collar piece.

Once I had the pattern all cut out, I realized I wanted the back of the collar to sort of notch out at the bottom.  A quick measurement and marking and that's done too!

OHAI fancy tiny collar!   

Here's the back of the collar and that notch that I wanted.  The pattern called for a lapped zipper and I could only find a black zipper long enough for this dress!  Shame!

This looks like a finished dress and it kind of is, but the sleeves are way too freaking tight.  My dress is all done except not really wearable at all because it makes me have the Frankenstein's monster look.  

I only look happy because of the smile detector.  Trust me, I am pissed that I haven't learned my own arm size yet.  I made the sleeves extra big.  Still not big enough.  Grrr.

One last parting sort of finished object picture. I love the dress.  I think it's fabulous.  Gotta fix those sleeves though.  I'll post my sleeve adjustments in my FO post, which will hopefully happen next week.
 
Happy HUMP DAY!

Wednesday, October 23, 2013

(Pattern) Stash Enhancement

I keep a list on my phone of patterns I like while I'm reading blogs.  It's always ready when JoAnn's is having pattern sales.  I bought a bunch of patterns over the last couple weeks and I'll probably pick up some McCall's patterns tomorrow during the 99¢ sale.
 
Butterick 5930 has princess seams, a faux-wrap style, and a collar.

Simplicity 2146 has princess seams, 4 sleeve options, and 2 neckline options.

Simplicity 2648 has princess seams, two bodice options, and two sleeve options.  You can also choose between a tab and a belt front.

Simplicity 1801 has a knee and maxi length and a couple sleeve options.  Not for knits though, despite the surplice dress look.
Simplicity 1666 has a dress, skirt, and peplum top pattern, as well as a tote.  Lisette patterns are made by the same designer of the Oliver + S patterns.  I wish I was close enough to small children to sew cute things for them.  Eh. Who am I kidding?  I'm too selfish for that nonsense.

Simplicity 1606 has princess seams and a circle skirt. Optional lace overlay, halter, or high neck bodice.
This is New Look 6020 (not on sale below the standard $3.99 price), which has three neckline options, a belt, and a clutch.  I just had to have this one.  I love the neckline options, especially D.

Simplicity 2337 has front and sleeve variations.  I'm not digging the gathered sleeves, but I love the gathered front.

Butterick 5932 is PJs.  I made the tank/dress version A already.  It needs to be less cold outside, so I can take photos of it.  
Butterick 5953 is a fitted wrap dress with a back godet and side front button closure.

Butterick 5882 has a close-fitting boned bodice with princess seams and a bias pleated bra and straps.

Butterick 5814 is the Joan Holloway wiggle dress.  Seriously.  The season 4 (I think) Mad Men poster has Joan in a dress just like this.  Thanks for the dress, Gertie.

Speaking of Gertie. . . I finally got her book!  

I've only read to page 34 so far, but I'm so in love with it!  I read several not so stellar reviews on this book, but I had to give it a go myself.  It has so much information in it.  The techniques section is amazing.

This is just two pages of fabric descriptions--there's more!  I love this illustration.

The size chart is a little weird.  I think I'm a "5" according to this and my high bust measurement.  I'm not sure which cup size these patterns are written for, but I imagine I will read something about that in the book.  I always get confused on the hip measurement too.  My butt is at least 2" bigger than my actual hips.  Should I make the size that's bigger to match my butt, or is that largely irrelevant if there is a skirt involved?  There are so many of these things I just have to learn.  I was working on the Clover pants (yes, still!) and I keep going back and forth between what size to make.  I think I'm just going to have to go with it and hope for a wearable muslin.  These actual muslins are getting old.

Gertie shows the innards of most of the garments in the book.  I think that's so important, especially when you are teaching couture.  I want to see your silk organza and horsehair.  You are telling me it's important for reason XYZ, yet you leave the reader open to interpret shortcuts taken by the sewer by not showing the inside.  I want to see what the insides look like!

Here's the pattern envelope and the pattern pages.  The patterns are printed double-sided on a fairly thick paper.  This is another something I've read negative things about.  I actually LOVE the thicker paper.  This will be so much easier for tracing.

There are only 5 folded pattern pages in my book, so hopefully they're all there! I spent a big chunk of Saturday tracing patterns.  I don't think I'll have any pattern tracing mojo for a while, which is perfectly fine by me.  I need to get reading!