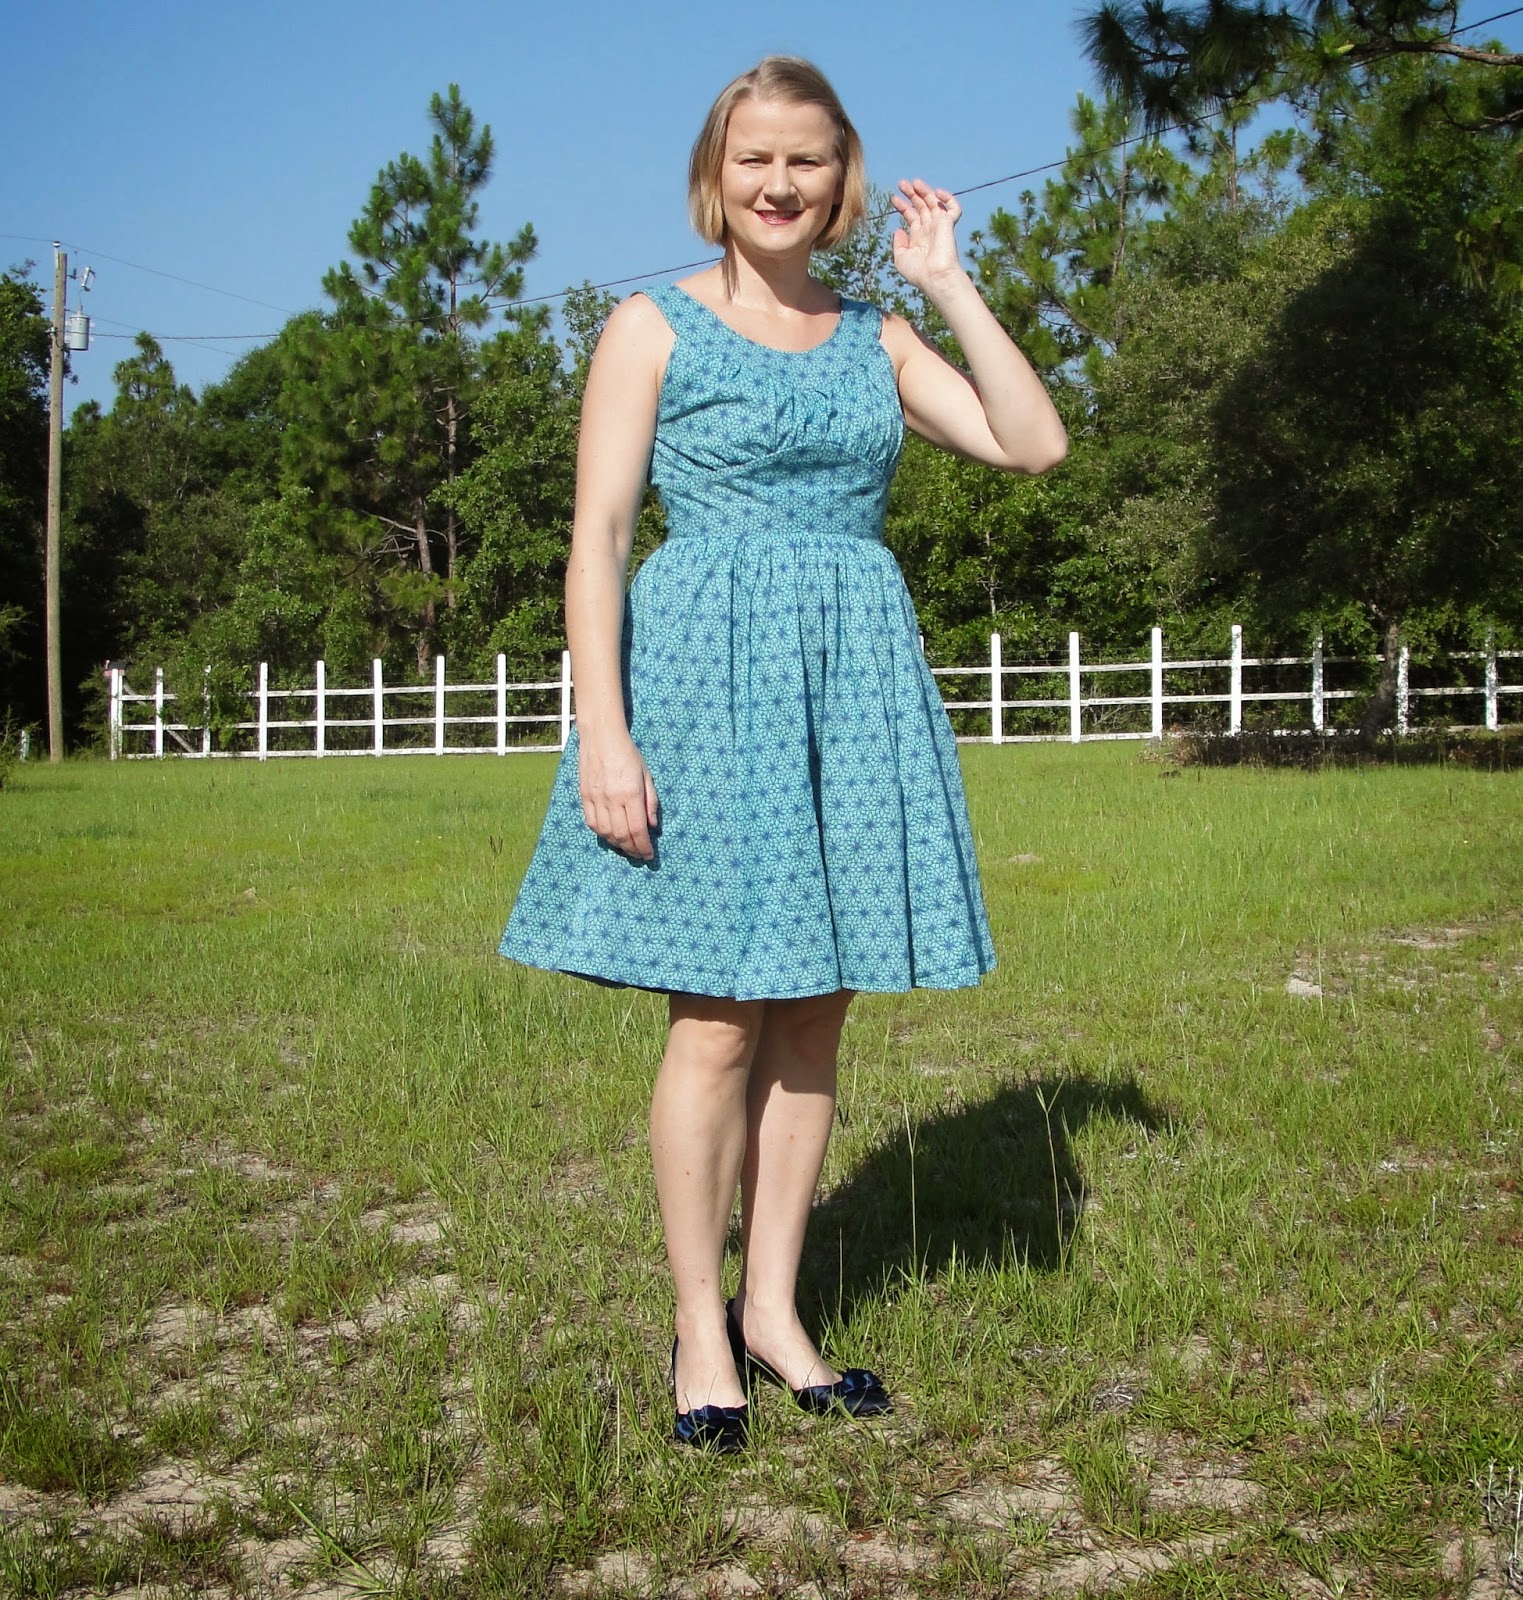
Monday, June 30, 2014

FO: Lady Grey

"Lady Grey"

Just the Facts:
Fabric: 1.5 yards of grey 95% rayon/5% spandex knit from JoAnn's $10.50
Notions: Thread, clear elastic $8 (4 cones of serger thread on sale included)
Pattern: Lady Skater
Year: modern ~2013
Time to Complete:  about 2.5 hours
First Worn:  June 23, 2014
Wear Again:  yuppers
Total Cost: $18.50 not including the pattern
I really pushed to get this dress finished on a Sunday evening.  I normally would have unpicked seams when the corners didn't line up (like on one of the sleeve cuffs and one of the underarm seams), but I let it go on this dress for the sake of expedience.  I am normally a huge perfectionist and I struggle with leaving things slightly off.  It's something I'm working on--not being so OCPD about things.

When I bought this fabric, I thought it would make a great basic dress.  I rarely wear grey.  I think it's boring.  So that was probably a mistake.  I need to do Colette's Wardrobe Architect project to make sure I'm keeping the personal in personal style. 

Trust me.  I'll still get lots of wear out of this dress.  I will always need to add an accessory of some sort to brighten up my face.  See, I have a yellow skin tone and I have to be careful of what I put near my face to avoid looking sallow.


See what I mean?  Instant sallow.  

 I used the same pattern measurements as the last 2 versions:  3 for my shoulders and high bust grading down to a 2 for my waist.  I love how easy this pattern makes it to sew for others too.  I'm positive I could churn one of these out for anyone and everyone who asked me to. I'm thinking about making one for my mom, but she wouldn't like this clingy fabric (she has a thyroid issue that makes her bloated all the time--gotta hide that).

I bought these adorable grey shoes a couple months ago.  They were incredibly inexpensive.  I normally HATE cheap shoes, but as it turns out, these shoes are actually well-made.  I just need to get a pack of those heel grippers to make the shoes fit perfect.  

(This picture is kind of unfortunate.)  I'm still embracing the back wrinkles.  I'm out of ideas on how to fix it.  I may only have this problem when I stand certain ways or something.  At least I can't see it, so whatevs.

Demonstrating the twirl, as I do. (Ignore my yard.  Limbs needed to be trimmed and it's a LONG walk to the other fence line where I deliver yard waste for decomposition.)

 Downside of this fabric is I get to feel like Marilyn Monroe when the wind blows.  WHEEEEE!


The lady skater (and most all other knit garment patterns I've found) calls for 1/4" clear elastic to stabilize a few key points.  I know certain stores online sell 1/4" elastic, but I find it a bit expensive compared to the slightly wider 3/8" clear elastic I can find in stores.  Here's what I do to handle that:

 When I begin sewing the elastic to the fabric, I don't match up the ends precisely.  Instead, I allow a bit of the elastic to hang over.  I put my needle position to the left slightly (which is the 1/4" seam allowance position on my machine), line the elastic up with the 3/8" marking on my throat plate, and line the edge of the fabric up with the edge of my presser foot (aka 1/4" marking).  This positioning ensures the elastic will be secure and within the seam allowance.  It really doesn't take much extra effort and saves me a bit of money.  Win.

 You will end up with a clean zig-zag with one point of the stitch on the elastic and one point just off. 

Another view of my elastic stitching magic.  My serger takes off the overhanging elastic when I finish the edges.  FUN FACT:  You can also use a strip of the selvedge edge in place of the clear elastic.  Self-fabric stabilizer FTW!

This is my machine and part of my sewing area.  I call this my watermelon room.  It's so green!  I have the pipe cleaners near to help keep my bobbin area clean.  Pipe cleaners are the bomb.  They effortlessly pull out all the fuzzies.
One of the changes I made for the Lady Grey was to put my hem stitching line a bit higher than normal.  I usually stitch about 1/4" from the fold, which leaves room for my serged edge to flip down and be annoying.  The higher stitching line looks like a hot mess underneath, but that serged edge ain't going nowhere!  The stretchy fabric was hard to beat into submission and I have a few wonky areas along the hem where the fabric didn't feed quite right.  I'm over it though. 

I also decided to use the zig-zag stitch around the neckline.  You can see more sections where the fabric didn't pull through correctly and I got a less desirable satin stitch out of the deal.  Nothing ventured, nothing gained right.  I will be trying to get my walking foot to work correctly before working on my next knit project.  IIRC, the thread nested on one side or the other.  It's going to take some trial and error to get it right.


Friday, June 27, 2014

Freezer Friday: Blueberry Froyo

 It's been a while since I posted an ice cream recipe.  Might have something to do with winter?  We had a winter here in Florida by the way.  We had a snowpacolypse complete with ice cover for days.  DAYS PEOPLE.  We were housebound the day after the storm.  The DOT put sand on all the bridges to help melt the ice.  Yes I know you are supposed to use salt, but we don't exactly keep stores of that around.  Now that we are back to sunny/rainy days here in Florida, it's time for a cold, sweet treat.

 Blueberry Froyo
 
Ingredients:
1 - 1 1/2 cups blueberries, fresh or frozen (I don't love blueberries, so I used less)
3/4 cup granulated sugar, divided
1 teaspoon lemon juice
2 cups vanilla yogurt (I used Chobani)
1/2 cup milk
2 teaspoons vanilla extract
 
Preparation:
Add blueberries, 1/4 cup sugar, and 1 teaspoon lemon juice to a medium saucepan and cook on medium heat for about 15-20 minutes.  While the blueberries are reducing, mix yogurt, remaining 1/2 cup sugar, milk, and vanilla extract in a bowl.  Once the blueberries are reduced enough, strain the blueberry syrup into the yogurt mixture and stir to combine.  Put the strained blueberries and the separate froyo mixture in the refrigerator to cool for a minimum of three hours.  Once the froyo base is cold again, cream it up in your ice cream maker according to manufacturer's directions.  When there is about 5 minutes of churn time remaining, add in the cooked blueberries.  If you add the berries too early, they tend to sink to the bottom of the bowl.  We want even berry goodness throughout the froyo.  You can choose to eat this soft-serve, or let it firm up in the freezer for a few hours before diving in.  Enjoy! 
 
(Aside:  I like chunks in my ice cream and froyo, so I added the cooked fruit back during the process.  You can throw away the berries if you want smooth froyo.  If that's the case, you might want to reduce the blueberries even more and make a sort of sauce instead.)

Cast of Characters:  Blueberries, vanilla yogurt, lemon juice, milk, vanilla extract, and sugar (suprisingly absent from the photo)

Put blueberries, 1/4c sugar, and 1t lemon juice in a medium saucepan and reduce for about 20
minutes
 
This is what you will end up with after 20 minutes--just a slightly thicker consistency, but definitely not syrup (yet.  Besides, you would first bring water/sugar/fruit mixture to a boil, then simmer for 15-20 minutes on a low heat in order to get a good syrup. /tangent)
 
Combine 2 cups vanilla yogurt and 1/2 cup sugar in a bowl

Add 2t vanilla extract and 1/2 cup milk

Strain liquid from berries into the yogurt mixture

Stir and marvel at the tie dye fancy
 
Tie dye effect is mixed away.  Be sad for a minute and then remember you will have tasty noms later!  Be happy again! 

Add berries back when you have about five minutes of churn time left

C'est fini!


Hope you get a chance to relax and have something delicious this weekend!
~elle

Thursday, June 26, 2014

Pinteresting: Summertime

I fell back down the Pinterest rabbit hole!  In honor of the start of summer, here are a few summer-themed pins for you to check out.

Thai quinoa salad with fresh herbs and a lime vinaigrette.   Perfect for a light lunch, or add some chicken, shrimp, or crab meat for a hearty and healthy dinner.  Best of all, you won't heat up your kitchen making this!

Need something a little "stronger?"  Enjoy a simple strawberry lime mojito.  Skip the rum and the kids can have some too.

Always a good time for a reminder to eat local and wear sunscreen.  Though some wellness practitioners would tell you to get outside for 15 minutes without sunscreen to get your Vitamin D for the day.  Doctors never agree on anything.

Summer could be a good time to create an inviting place for the fairies to visit?  Try a bird bath fairy garden.

Buzzfeed always has the best dos and don'ts.  Check out this one for summer.

I would be remiss if I didn't suggest a sewing project.  I've had my eye on this weekender bag by Amy Butler for a while.  I highly recommend checking out this blog post for a helpful link roundup if you are considering taking on your own weekender.

I'm pretty sure I'm heading to Houston and Las Vegas this summer.  First time for both!  Do you have any summer travel plans?

Wednesday, June 25, 2014

Random Wednesday Happenings

Have any of you heard of Graze?  I've been a subscriber for several months now and I really like it.  Graze is yet another subscription service, but instead of makeup, yarn, accessories, or dog treats, you get healthy snacks.  I tend to be a grazer (heh) throughout the day.  I don't eat a lot of food, but I still love my snacks--salty, sweet, savory--Graze has it all.  Here's my latest box:

 Every 2 weeks, Graze automatically sends me a box of 4 snacks.  There is a rating system on the site to narrow down your snacking preferences. 

Trash:  Never send me that item.  I trashed Mango stuff and anything with white chocolate right away and a couple other snacks I tried and didn't like.
Try:  Snacks that you haven't previously rated otherwise.
Like:  Send me occasionally.
Love:  Send me frequently.

All the snacks Graze sends have some sort of benefit.  They may be a serving of fruit, a good source of whole grains, a source of protein, etc.  Graze also gives you the nutrition info in the box.  I have my Graze boxes delivered to my office.  It's a great mid-week pick-me-up.  I think Graze snacks would be great to send to school with your kids too.  It's built-in portion control and is better for you than Doritos and cookies.

I get my boxes on Wednesdays normally (this one was late!), so I only had a chance to try one last week.  I tried the twist of black pepper popcorn.  I wasn't sure what I would think of it.  At first I couldn't taste the pepper at all.  After a few handfuls, the pepper was in force!  It was a nice change from the typical salty popcorn I normally eat and I really loved it.  My co-worker thought it was great too.  The snacks normally aren't big enough for real sharing, but popcorn from Graze is about 2/3 the size of a standard popcorn bag I think.  Plenty big for sharing.

Graze used to be invitation-only.  I'm not sure that's the case anymore, but if you use my referral subscription code, you get your first and fifth box free.  (And I get $1 off my next box, full disclosure.)  People see me with my Graze snacks and always think it's worth it.  Oh yes, the money part.  Graze costs $6 per box including shipping.

These chili and honey almonds were my favorite Graze snack so far.  They NEED to send me more of them!

I walked around my yard on Sunday to see what was going on.  Well, I actually saw this butterfly and chased it around my yard, bumping into other things along the way.


  Here's what's "growing" on around the yard.

SO MANY PEARS.  These need another 45-60 days on the trees.

A couple apples.  This tree has never been a big producer.  It flowers early in the year before the bees really come out.

Blackberries.  I have to get them before the birds do.  The birds are usually faster.  I tend to get enough for a smoothie each year. 

That's it for today.  How does your garden grow?

Tuesday, June 24, 2014

Fashion Plate: Heart and Solar System


Here's another notched-sweetheart neckline dress for you.  Modcloth's Heart and Solar System dress is the inspiration this week.  I found this solar system fabric by Timeless Treasures that I think is a great match for the pattern.  New Look 6020, blah, add pockets, blah, you know. 

I just traced off the pattern for New Look 6020 and I will do my absolute best to photograph and document the changes for everyone.  I will definitely be adding pockets at the very least.  I will possibly fully line the dress and move the zipper to the back.  This is going to be a July project for sure.

Monday, June 23, 2014

FO: Lisette


"Lisette"


Just the Facts:
Fabric:  2.5 yards each of blue floral lawn and navy poly/cotton from JoAnn's  $10
Notions:  Thread and zipper $2
Pattern:  Colette Chantilly
Year:  modern ~2009
Time to Complete:  15 hours maybe?  I don't keep track of time.  I focus on getting the details right rather than rushing to get it finished.
First Worn:  May 17, 2014
Wear Again:  yes and I have several times already
Total Cost:  $12 not including the pattern


It was really difficult to get photos of this dress.  It was always too sunny when I wore it (not that these photos are much better. . .).  I made Version 1, which is fully lined, and I added pockets like Version 2.  

 
 I love this dress mostly because I get to wear my blue shoes!  Satin, not suede.

Adding pockets to a fully-lined dress with a side zipper was quite the challenge.  I had to really think about how all the pieces would fit together.  I didn't want to sew the lining and the shell together at the skirt because that would take away some of the movement the two separate skirts provide.  I could have put the pockets on the lining and tacked the shell fabric pocket seam allowance down to the lining pocket seam allowance.  Ultimately, I decided to sew the three layers of fabric as one between the circles.  Then I stitched around the pocket bag as normal.   I will experiment with adding pockets on fully-lined garments in future projects.  I went through a lot of trial and error and there has to be a better, cleaner way to add pockets to a fully-lined garment.

I use a heavily modified bodice front D piece.  On this dress, it seems too modified.  :-/  The midriff front doesn't lay flat between the boobs.  When I first made the bodice muslin for this dress, I couldn't stand all the gaping fabric.  I took out about 5 inches of width and probably an inch of length to get a bodice I was happy with. 

I used the size 0 for this one.  I found I have to go up in size when the bodice has actual shoulders.  Here, you can see just how much extra fabric I took out.  I deleted my photos from my fitting session a couple years ago.  I think I'm due for a refitting though.  I feel like my underbust is bigger than it used to be. Perhaps lung expansion due to all the running?  Am I making stuff up here?

Look at all that skirt body!  My lining fabric is about twice the thickness of the cotton lawn, which I think works well for this dress.  My white chantilly is light swiss dot and light batiste and it just floats along.  This blue dress is a bit more stiff and stands away from my body more.  It's like a petticoat without the extra layer!

I have crazy hair!  When I do long runs at night, I take a shower after because I quite literally can't stand the smell of myself.  And showers are good.  I normally sleep in the next morning and skip the shower, leaving me with crazy bedhead.  Ugh.


This is my third one of these, so there isn't much for me to say.  It twirls really well!  Twirlability is my favorite feature.

Side zip like a boss!  I bought a bunch of invisible zippers from zipit on etsy.  Great seller.  I highly recommend her if you don't already use that seller.  I ordered my zippers on Thursday afternoon and received them Saturday.  I was having a really hard time finding a navy invisible zipper locally and I was stuck on the dress waiting for a stupid zipper. 

I ordered white and the assorted bunch of 22" zippers.  I loved the extras I got with my order.  The fortune teller fish was adorable.  

It says I am in love.  It said I was passionate right after I got out of the shower.  Wonder what my fortune would be if I put my hand in the freezer?  Cold as ice?


Look at the lining!

Also look at my pockets!  This picture was a great idea in my head.  So Much Leg.

I don't like these wrinkles in the back and I'm not really sure what to do about it.  It could be caused by the midriff front being too tight.  

  
I don't know if this is a serger mishap or a defect in the fabric I didn't notice.  I put a bit of fray check on it and am forgetting about.  OWN THE IMPERFECTIONS!

I could use a bit of hand-stitching here.  This is the innards of where the pocket is.  The pocket itself is fully closed, it just isn't 100% attached to the lining.


Here it is from the lining side.  I didn't serge this pocket.  I knew there was a reason you aren't supposed to feed the gremlins sew after midnight.

Oops.  I changed my serger thread already.  Boo.

Here's a close-up of the fabric.  It reminds me of something I made with a spirograph.  The pattern says to topstitch the midriff piece on top and bottom and I think that looks silly.  I don't do that for this dress.  I get the value in it--keeping all four layers of the shell's midriff together--but it's my dress.  I do what I want.

Another oops.  Didn't sew another fashion fabric to the wrong side of the bodice midriff.  I was supposed to cut 2 each fashion and lining fabrics.  I was running out of fold when I was laying everything out and I forgot to go back and cut it from the crossgrain on top.

 
This was a great project for me.  I got my pockets!  I wear this dress about once a week right now because it's so perfect for me.